nginxでのPHP実行環境の構築
カテゴリ:Webサーバ
CentOS/Ubuntu 両対応
nginxでPHPを実行できる環境を構築する手順を解説します。
phpとphp-fpmのインストール
以下のコマンドを実行してphpとphp-fpmのインストールします。
CentOS 7 の場合:
# yum -y install php
# yum -y install php-fpm
CentOS 8 の場合:
# dnf -y install php
# dnf -y install php-fpm
Ubuntu の場合:
# apt -y install php
# apt -y install php-fpm
Notephp-fpm (PHP FastCGI Process Manager) は、PHP の FastCGI 実装のひとつで、 主に高負荷のサイトで有用な追加機能を提供します。
php-fpmの設定
www.confファイルのuserとgroupの値をapacheからnginxに変更します。
# vi /etc/php-fpm.d/www.conf
user = nginx
group = nginx
NoteUbuntu の場合は /etc/php/x.x/fpm/pool.d/www.conf ですが、user、group はデフォルトの www-data のままにしておきます。(x.xはPHPのバージョン)
PHP FSMのsockファイルのパスの確認
www.confファイルのlistenパラメータに指定されているsockファイルのパスを確認しておきます。このパスを後述するnginx.confファイルのfastcgi_passと合わせる必要があります。
listen = /run/php-fpm/www.sock であれば、fastcgi_pass には unix:/run/php-fpm/www.sock または unix:/var/run/php-fpm/www.sock を指定します。(/var/run は /run へのシンボリックリンク)
# cat /etc/php-fpm.d/www.conf | grep ^listen
listen = /run/php-fpm/www.sock
listen.acl_users = apache,nginx
listen.allowed_clients = 127.0.0.1
nginxの設定
/etc/nginx/nginx.confファイルを開き、rootパラメータにドキュメントルートのパス、indexパラメータにindex.phpを加え、location ~ \.php$ブロックを追加します。
CentOS の場合:
# vi /etc/nginx/nginx.conf
Ubuntu の場合:
# vi /etc/nginx/sites-enabled/default
serverブロックの設定例)
http {
    server {
        listen 80;
        server_name localhost;
        root /var/www/html;
        location / {
            index index.php index.html index.htm;
        }
        location ~ \.php$ {
            fastcgi_pass unix:/var/run/php-fpm/www.sock;
            fastcgi_index index.php;
            fastcgi_param SCRIPT_FILENAME $document_root/$fastcgi_script_name;
            include fastcgi_params;
        }
        charset UTF-8;
    }
include /etc/nginx/mime.types;
default_type application/octet-stream;
log_format main '$remote_addr - $remote_user [$time_local] "$request" '
'$status $body_bytes_sent "$http_referer" '
'"$http_user_agent" "$http_x_forwarded_for"';
access_log /var/log/nginx/access.log main;
sendfile on;
#tcp_nopush on;
keepalive_timeout 65;
#gzip on;
include /etc/nginx/conf.d/*.conf;
}
Ubuntu の場合は、location の設定はデフォルトでコメントになっているので、コメントを外すのでもよいです。 なお、fastcgi_pass の設定はどちらか一方を外します。
        # pass PHP scripts to FastCGI server
        #
        #location ~ \.php$ {
        #       include snippets/fastcgi-php.conf;
        #
        #       # With php-fpm (or other unix sockets):
        #       fastcgi_pass unix:/var/run/php/php7.4-fpm.sock;
        #       # With php-cgi (or other tcp sockets):
        #       fastcgi_pass 127.0.0.1:9000;
        #}
テストページの表示
index.phpを作成し、phpinfo() を実行するコードを記述します。
vi /var/www/html/index.php
<?php phpinfo(); ?>作成後、以下のコマンドを実行し、php-fpmを起動、nginxを再起動します。
CentOS の場合:
# systemctl start php-fpm
# systemctl restart nginx
Ubuntu の場合:
# systemctl start phpx.x-fpm
# systemctl restart nginx
x.xにはPHPのバージョンを指定します。
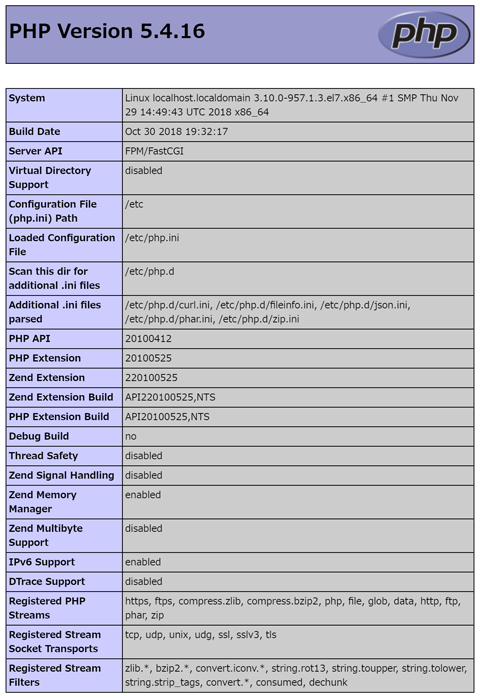
Webブラウザで http://サーバーのIPアドレス/ を開き、PHP情報が表示されることを確認します。

php-fpmの自動起動を有効にする
以下のコマンドを実行してphp-fpmの自動起動を有効にしておきましょう。
# systemctl enable php-fpm
実行例)
# systemctl enable php-fpm
Created symlink from /etc/systemd/system/multi-user.target.wants/php-fpm.service to /usr/lib/systemd/system/php-fpm.service.
トラブルシュート
「502 Bad Gateway」エラー
/var/log/nginx/error.log には以下のようなエラーが出力されている。
connect() failed (111: Connection refused) while connecting to upstream, client: ...
www.confファイルのlistenパラメータに指定されているsockファイルのパスとnginx.confファイルのfastcgi_passが合っていない場合に発生します。
例えばwww.confファイルが listen = /run/php/php7.4-fpm.sock であれば、nginx.confファイルでは fastcgi_pass unix:/run/php/php7.4-fpm.sock; または fastcgi_pass unix:/var/run/php/php7.4-fpm.sock; が指定されている必要があります。
「Primary script unknown」エラー
/var/log/nginx/error.log には以下のようなエラーが出力されている。
FastCGI sent in stderr: "Primary script unknown" while reading response header from upstream ...
以下の3点を確認してください。
fastcgi_paramが以下のように設定されているか。
fastcgi_param SCRIPT_FILENAME $document_root/$fastcgi_script_name;
rootパラメータに正しいドキュメントルートが設定されているか。
server {
        root /var/www/html;
        ...
        }
location内にrootパラメータを記述していないか。(location内のroot指定はNG)
server {
        location / {
            root /var/www/html;
            ...
            }
        }
公開日時:2019年05月06日 02:34:02
最終更新日時:2021年08月21日 07:38:57